Colour and style
The three chips
Near the bottom of the tool palette are three colour chips:
- Stroke — the outline
- Fill — the inside
- Text — the label
Select something, click a chip, and change it. The same three chips appear in the Shape Properties panel if you'd rather work there.
Setting defaults
Click a chip with nothing selected and you're setting the default for the next thing you draw. Out of the box that's a white fill, a near-black stroke, and dark grey text.
Inside the colour popover
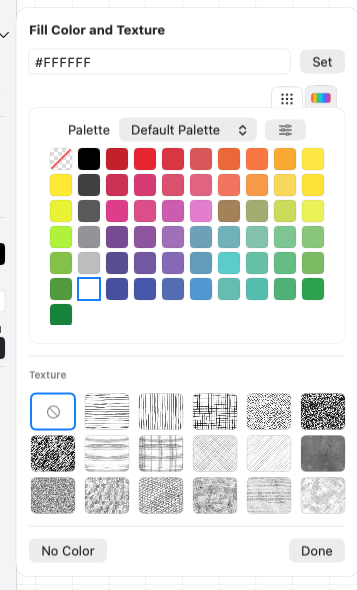
Hex field at the top. Type #RRGGBB and hit Set if you know exactly what you
want.
Two tabs:
- Palette — a fixed grid of 60 colours, plus any custom palettes you've made.
- Color Picker — Hue, Saturation, Brightness and Opacity sliders, plus a macOS Colors… button that opens the system colour panel.
In both tabs, single-click applies and double-click applies and closes the popover. Once you know that, styling gets a lot quicker.
There's also a No Color button, for shapes that should have no fill or no outline at all.
Opacity
Opacity lives on the colour, not the object — it's the fourth slider in the Color Picker tab (or an eight-digit hex value). There's no separate per-object opacity control.
Textures
Below the colours is a grid of 17 textures plus No Texture: hatching in various directions, pencil fills, watercolour, grain, chalk and so on.
This is where the hand-drawn look actually comes from. A plain flat fill looks like every other diagramming tool; a pencil hatch looks like SimpleDiagrams.
Same rule: double-click a texture to apply it and close.
Line weight and pattern
For shapes, lines and polyshapes, the stroke popover also carries:
- Line Weight — 1 to 100 points, default 2
- Pattern — Solid, Dashed or Dotted (lines and polyshapes only)
Library symbols get an Outline Pattern option instead — Original, Solid, Dashed or Dotted. "Original" keeps the outline the artist drew, which is usually the right answer.
The eyedropper
Press I. Click a shape whose style you like — the eyedropper fills up. Now click any other object to give it that style. Keep clicking to keep applying.
- Alt-click empties the eyedropper so you can pick up something new.
- Clicking empty canvas clears it too.
I don't know why it took until version 4 to add this.
Copy and paste style
If you'd rather use the keyboard: Cmd+Alt+C copies a style, Cmd+Alt+V pastes it. These use their own private clipboard, so they don't disturb whatever you've got copied normally.
Quick Styles
The Quick Styles panel (Cmd+Alt+5) is where you park the combinations you're using a lot in this document.
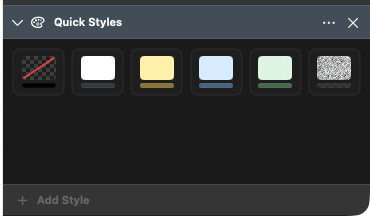
- Select an object, then click Add Style from Selection (or right-click the object and choose Add to Quick Styles).
- Click a saved style to apply it to whatever's selected.
- Right-click a saved style for Update from Selection or Delete Quick Style.
Quick Styles are saved in the document, so they travel with the file. You can keep up to 32, which is more than anyone should need.
Custom palettes
If you work to a brand palette, make it once and keep it.
In any colour popover, use the Palette picker and the Manage Palettes button. The Manage Palettes sheet lets you create, duplicate and remove palettes, name them, add and remove swatches, set a texture per swatch, and import or export as JSON.
Legacy .sdcp palette files from version 4 import here too. Note that importing makes
an independent copy — palettes don't stay linked to the file they came from — and
nothing is saved until you click Save.