Drawing and text
Libraries cover most things, but sometimes you need to draw the thing yourself, or just write on the page.
Pencil and Marker
Pencil (P) draws a smoothed freehand line. Marker (M) draws the same way but unsmoothed and chunkier, so it reads like an actual marker pen.
Each has a small chevron on its palette button. Click it for Line Weight — 1 to 100 points. Pencil defaults to 1, Marker to 10.
Each stroke you draw becomes its own object, so you can select, move, resize and restyle it afterwards.
About erasing
There's no eraser. Select the stroke and press Del, or Cmd+Z if you've only just drawn it. For finer work, edit the individual points — see below.
Polyshape
Polyshape (G) builds a shape point by point, which is how you get an outline that's exactly the outline you wanted.
- Click to drop a corner point.
- Alt-click to drop a curve point instead.
- Click near the first point (once you have three or more) to close the shape.
- Double-click, or press Enter, to finish an open path.
- Esc abandons it.
A closed polyshape can be added straight to a shape library — see Your own libraries.
Editing points
Anything made of points — polyshapes, pencil and marker strokes, converted SVGs — can be reshaped afterwards.
Select it and press Enter, or double-click it, or right-click and choose Edit Points.
| Action | How |
|---|---|
| Move a point | Drag it |
| Bend a curve | Drag the curve handle |
| Add a point | Alt-click on the path |
| Straight ↔ curved | Double-click the point |
| Delete a point | Select it, press Del |
| Leave the mode | Esc, or Finish Editing Points |
Rectangles, ellipses and notes
Three shapes have keyboard shortcuts but no palette button:
- Rectangle — R
- Ellipse — O
- Note — N
Click to place one at a default size, or drag out the frame you want.
Notes come in two looks. Use Page ▸ Add Sticky Note or Page ▸ Add Index Card, or select a note and switch between them with the Annotation picker in the Shape Properties panel.
Text
Free-floating text
Press T and click for a text box at the default size, or drag to set its size. The editor opens immediately.
Labels on shapes
Double-click any shape to type a label on it. Double-click a connector to label the line. This is usually what you want — the text belongs to the shape and travels with it.
While you're editing a shape label, you can drag the border to move the text area, drag a corner to resize it, or use the round handle to rotate just the text.
Editing keys
| Key | What it does |
|---|---|
| Cmd+Enter | Commit the text |
| Esc | Cancel and discard |
| Enter | New line |
| Click elsewhere | Commits |
Formatting text
The Format menu has the basics:
| Command | Shortcut |
|---|---|
| Show Fonts | Cmd+T |
| Bold | Cmd+B |
| Italic | Cmd+I |
| Underline | Cmd+U |
| Align Left / Center / Align Right / Justify | — |
The Shape Properties panel (Cmd+Alt+4) has more:
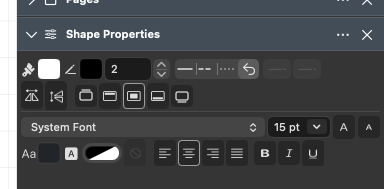
- Font Family — System Font plus everything installed on your Mac
- Font Size — pick from the list or type a number; there are buttons to step it up and down
- Text colour, and a Text Background colour with a Clear Text Background button
- Alignment and Bold / Italic / Underline buttons
- Text position relative to the shape: Above, Top, Middle, Bottom, Below
That last one is more useful than it sounds. Putting a label below a symbol instead of across it is often the difference between a readable diagram and a mess.
Note
Quick Styles save fill and stroke, not text formatting. If you want consistent text, set the font once with nothing selected and new objects will use it.